Worpress Posts, Pages, Menus & Basic Settings
Pages & Posts
Posts show up on you blog page usually with the latest at the top. Pages are like posts except they don’t show up on your blog. pages have their set place on your website. Your Homepage will be a page and your artist statement will be a page. The galleries that show your artwork will also be pages.
- Posts – click “Posts” or “All Posts” they will both lead you to the same place
- Hover over “Hello World” and click the red “Trash.” This is just a sample post and it is good to get rid of it.
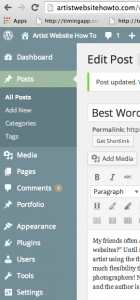
- We won’t add a post yet but when you are ready click “Add New”
- Pages – click “Pages” or “All Pages” they will both lead you to the same place
- Hover over “Sample Page” and click the red “Trash.” Might as well get rid of this too
- We will need a few pages to work with so click “Add New.” Here are some sample pages that would work for an artist website.
- Home – Instead of calling the home page home name it with something that will have meaning to the search engines, like “Oil Paintings by Jane Doe”
- Type that title in the title bar, then in the editor box below type “Here is where the content goes” or something like that just to see where it shows up.
- Click “Publish”
- Artist Statement – Hover over “Pages” and Click “Add New”
- Again title the page with a search engine friendly name like “Jane Doe – Artist Statement.” It the content box, type “My artist statement goes here” or something – you will change it later.
- Gallery Page – Again, Click “Add New” and follow the steps above to to create a page for your artwork. we will add the art gallery later.
- Blog – if you want a blog add that page. You can title it “Blog” or “News.” Don’t add any content to this pages. It will be blank until you start creating posts. Then your posts will automatically show up on this page.
- Add the rest of the pages now or you can always add them later.
Settings
- General – start by scrolling down to “Settings.” Click or hover over “Settings” and choose “General”
- Make Sure the “Title” is correct and add a “Tagline.” If you don’t have a tagline make sure to erase “Just Another WordPress Blog”
- Make sure the email address is right
- Adjust the timezone
- Click “Save Changes” at the bottom, and you’re all set
- Reading – for “Front page displays” Check “A Static page.” Choose the name of your home page for “Frontpage” and the title of your blog page (if you have one) for “Blog.” If you don’t have a blog, leave this as “Select”
- Click “Save Changes”
- Permalinks – Click or hover over “Settings” and choose “Permalinks”
- Check the circle for “Post Name.” This gives your pages and posts nice, search-engine friendly url’s
- Click “Save Changes”
Menus
- In your WordPress Dashboard, choose “Menus” under “Appearance” in the left column.
- Type in a name and click, “Save Menu.” I usually name it “Main Menu” but anything is okay.
- Under “Pages” in the left select the “View all” tab.
- Check the boxes to the left of each page that you want to add to the menu, then click “Add to menu”
- Drag and drop the menu itemes (pages) to re-arrange. You can also click the triangle to expand a menu item and change the “Navigation Label.” This will not change the page title, but it will change the link that appears in the menu
- Click “Save Menu”
- Near the top of the page select the “Manage Locations” tab
- For the Main Menu select the menu that you just created
- Click “Save Changes”
- Every time you add a new page that you want on the menu, you have to come back here to add it with the steps above.
